Elizabeth Cooper
I love participating in challenges. I knew I wanted to do something for this week's Play Date Cafe challenge, but the colors were very Christmas-y, and, well, I'm a little burnt out on Christmas projects.

I do have a whole lot of birthdays coming up over the next couple of months, which is how this card came about:


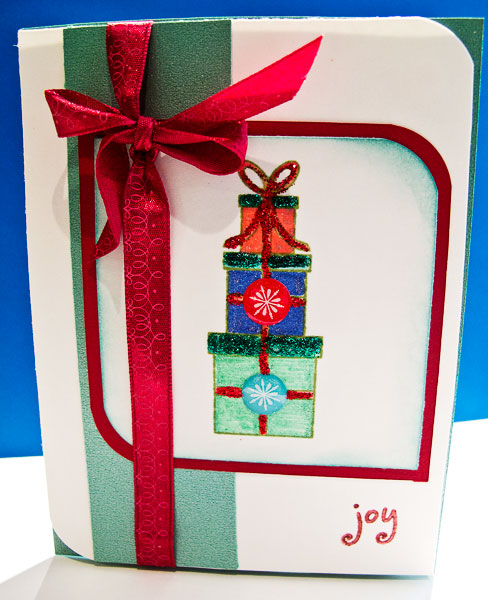
I thought the colors worked beautifully for a pretty, feminine birthday card. And as a bonus, I used scraps to pull most of it together!

I started with red and green scraps of cardstock. (I had plenty of both left over after Christmas.) Then I chose some coordinating paper scraps -- these happened to be from previous Jillibean Soup card kits -- and punched them using two different Fiskars edge punches. I also added a leftover scrap of a border from a Jillibean Soup die cut set at the top.

I punched out a piece of vanilla-colored scrap patterned paper using a 1 inch circle punch, and stamped the sentiment using Memento Ink in Bamboo Leaves. The stamp is from the All Year Greetings set by Fiskars. I thought the sentiment needed a little something extra, so I went over the word "birthday" with a Zig 2-way glue pen, and sprinkled some green glitter on top.


I created the flower from some Prima petals I had lying around, and used a green brad from the Recollections: Pastel Medium Squares package for the center. I attached the flower to the sentiment circle, and adhered the whole thing to the card front with foam adhesive.


Finally, I wanted to embellish the card front itself. So I used a piece of self-adhesive pearls from the Prima: Say It With Pearls package. I also filled in some of the edge punch holes using Stickles in Xmas Red and Firefly, and Liquid Pearls in Buttercup.


Elizabeth Cooper
I'm having to work over the holidays, so I've had very little time for anything even remotely relaxing in the last few days. At least until this afternoon, when I finished work early and was able to spend some time at my crafting desk.

I knew I wanted to enter the CAS-ual Fridays theme this week, which is kraft and twine -- two of my favorite crafting supplies. How could I resist? I set to work, and came up with this:


I started with a kraft card from Jillibean Soup. Then I cut a piece of pattern paper from the Fancy Pants Designs: Beach Bum 6x6 paper pad, and adhered that to the bottom of the card. On the pattern paper, I stamped the oval frame from Tim Holtz's Visual Artistry stamp set using Memento Ink in Rich Cocoa.

On a piece of white cardstock, I stamped the bird from the same stamp set, and used some blue Copic markers to color in his white feathers. I also added a blue rhinestone eye, and inked the edges of the paper using Distress Ink in Gathered Twigs. I matted the image onto kraft cardstock and adhered it to the card using foam adhesive.


I stamped the sentiment (also from the Tim Holtz Visual Artistry stamp set) onto more of that same pattern paper using Memento Ink in Rich Cocoa. I matted the paper onto more kraft cardstock, inked the edges using Distress Ink in Walnut Stain, and adhered the whole thing to the card using foam adhesive.


Finally, I added faux stitching around the sentiment using white gel pen, and wrapped some brown-and-white twine around the center of the card.


Elizabeth Cooper
Here's the last set of Christmas cards I sent out this year.

I hope you're all having a fabulous holiday season!

Christmas

Joy

25th

'Tis the season

Enjoy the season

Elizabeth Cooper
Here's yet another set of Christmas cards I created for the 2011 season. If you have questions about any of the supplies or techniques I used, please ask them in the comments.

Season's Greetings

Be Merry

Winter Wonderland

Merry Christmas

Let It Snow

Elizabeth Cooper
Here is the next set of Christmas Cards for 2011.

Again, because there are so many of them, I won't be posting descriptions or supplies. But if you have questions about any of the cards, leave me a comment and I'll be sure to reply.

North Pole

Cute Christmas Gift Tag Set

Happy Holidays

Merry Christmas

North Pole 2

Elizabeth Cooper
All right, I admit it... I waited until the last possible minute to create my Christmas cards this year. And then I ended up doing a 3-day marathon in which I got them all done.

Everyone one: created, personalized, addressed, and posted. In 3 days.

Now, I'm sure that's not a record, but it sure is for me! So now that the Christmas cards are done, life can go back to normal around here. And I can start posting the cards!

Here are the first five. Because I've got so many to post, I won't be doing in-depth descriptions or listing supplies. If you have questions about specific tools or techniques, please let me know in the comments.

Christmas Joy

Deck the Halls

I Believe

Noel

25

Elizabeth Cooper
I'll be hand-delivering this card to a good friend in a few days. I knew I wanted something decidedly masculine. No flowers, butterflies, or sparkles. Since I love everything feminine, this was quite a challenge for me! In the end, I'm very happy with the way this card turned out.


Once again, nearly everything I used on this card is from Jillybeansoup's September 2011 Card Kitchen kit. I started with a piece of Red Beans paper, which I cut into two different sizes. My friend is from Texas, and I thought the red-and-white stars had a Southern US look to them. Next, I cut a piece of Brown Pea Pod paper. I love the colors and bold pattern on this one.

The last pattern paper was a strip of Pinto Beans, into which I cut some slits and tied brown-and-white twine, securing it with a bow. For the sentiment, I used a die cut scallop shape from Jillibeansoup's Homemade 6 Bean Soup collection. In the center, I adhered a piece of white cardstock, which I stamped with a sentiment from the Fiskars All Year Cheer stamp set using Tuxedo Black ink from Memento. I inked the edges using Walnut Stain Distress Ink, and went around the oval with a brown marker.


The buttons were the finishing touch, and they come from Nikki Sivilis Cute as a Button collection. These are her Burlap Buttons.


My husband commented that the card has a leather feel to it. I love that!


Elizabeth Cooper
A good friend asked me to create a card for his mother's 71st birthday. I was thrilled to be asked, and had a blast creating this card.


I didn't want the focus to be on her age, which is why the number is more or less tucked under the flower. But let's start at the beginning, shall we? Once again, nearly everything I used came from Jillibeansoup's September 2011 Card Kitchen kit.

I started with 4 strips of pattern paper: Navy Beans, Green Stock, Black Eyed Peas, and Brown Pea Pod. After I adhered those onto the card, I added a strip of blue ribbon (it also came with September's kit). Then I rounded the corners of the card, and added faux stitching with a white gel pen.

The flower is made out of vintage papers that -- you guessed it -- also came with my kit. I crumpled the paper and layered it all together, then I added a button from my stash and secured it with a piece of Sew Easy Glitter Tertiary Floss in bright blue.


I stamped the sentiment using a stamp from Fiskars' Birthday Party stamp set using Colorbox black ink. And finally, I took two numbers from the chipboard sticker set that came with my kit, and used Distress Ink in Walnut Stain to fade some of the bright yellow color. I tucked those under the flower so they'd be out of the way, but still a nice surprise.


I hope she likes it as much as I loved making it. :)